
Hi everyone! Welcome to the second
tutorial of Photoshop CS6.
Last day we talked about how to get
a new file. From now on I consider that you have the knowledge to get a new
file.
Here is the content of this lesson.
Today I am going to teach you the parts of the Tool bar, and their tasks.
So, let’s get started.
This is tool bar. Let’s know the
tools one by one. In here I’m giving you a brief description only.
I’ll teach you how to work with
them in a later tutorial.

As you can
see there are 3 more items below Zoom tool. I’ll describe them later.
1. Move tool
Move tool is used to move selected things. After you clicked it, the
cursor will be changed.

2. Marquee tool
There are
four tools inside marquee tool.

If you
want to select a special part of a photo, this can be used. With Rectangular
Marquee tool you can select a rectangle shaped part of a photo. With Elliptical
Marquee tool you can select an elliptical shaped part of a photo. With other
two tools you can select a single line row and a single line column.
3. Lasso tool
This is
also used to select special parts of photos. There is a difference between
them. But I’ll talk about it later.

There are differences
among these tools. I’ll talk about it when we talk about how to use them.
4. Magic tool
This tool
is a wonderful tool. It’s very useful when we edit a photo.

Magic wand
tool is used to select similar color parts of a photo. It’s easy to remove
similar color parts of a photo using this.
Quick Selection Tool is somewhat similar to the Magic Wand
in that it also selects pixels based on tone and color. But the Quick Selection
Tool goes far beyond the Magic Wand's limited abilities by also looking for
similar textures in the image, which makes it great at detecting the edges of
objects.
5. Crop tool

The most popular way to crop an image is by using the Crop
tool.
Perspective crop tool has been designed to easily fix common
distortion and perspective problems in an image. In a later tutorial, we'll
learn how it works.
The slice tools in Photoshop are particularly useful for Web
designer’s as these allow them to divide an image up into rectangular sections,
and the slices can then be used in Photoshop to specify how each individual
slice will be optimized, what file format a slice area should be saved in and
what compression settings should be used.
6. Eyedropper tool

Photoshop uses the foreground
color to paint, fill, and stroke selections and the background color to
make gradient fills and fill in the erased areas of an image. The foreground
and background colors are also used by some special effects filters. You can
designate a new foreground or background color using the Eyedropper tool.
The Eyedropper’s cousin, the Color Sampler tool, looks like
an eyedropper with a small target next to the icon. The Color Sampler tool can
monitor changes to your image after you apply color-correction techniques and
filters.
The ruler tool lets you measure distances and angles in an
image.
The
Note tool makes notes that can be attached to an image.
7. Healing brush tool

The
Spot Healing Brush tool removes blemishes and objects.
The
Healing Brush tool paints with a sample or pattern to repair imperfections in an
image.
The
Patch tool repairs imperfections in a selected area of an image using a sample
or pattern.
Content Aware Move will allow you to select
pixels and move or extend them to another area of your image without the use of
layers and masks.
The Red
Eye tool removes the red reflection caused by a flash.
8. Brush tool
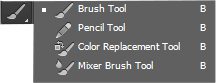
The Brush tool paints brush strokes.
The
Pencil tool paints hard-edged strokes.
The
Color Replacement tool replaces a selected color with a new color.
The
Mixer Brush tool Simulates realistic painting techniques such as blending
canvas colors and varying paint wetness.
Okay,that was a brief introduction of some tools of the
tool bar.There are more and we're going to talk about them in the next
tutorial.
See you!